Namaste everyone,
Hope you all are doing well! 🙂
I often find myself wanting to make emails look nicer when I’m sending a list of records to someone. So, what I do is use HTML to create a table with some cool styles (CSS) to make it look good. And hey, I can even add clickable links to make the whole email more interactive and polished! It just makes sharing information a bit more fun and organized.
The Use Case:
I have a model driven app and using cloud flows to automate tasks. One thing I’m working on is finding all the contacts linked to an account having the provided email. Once I find all contacts associated to that account, I want to neatly organize and send this information in a table along with the record URL. It’s like putting together a list of people related to a company and shooting it out in a nice, organized way.
Steps for the Power Automate cloud flow:
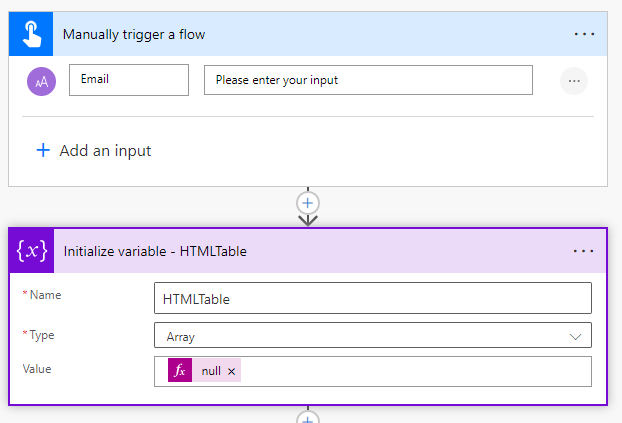
First things first, we must type in the email address ourselves – just punch it in manually as the initial step. And then initialize array variable – HTMLTable.
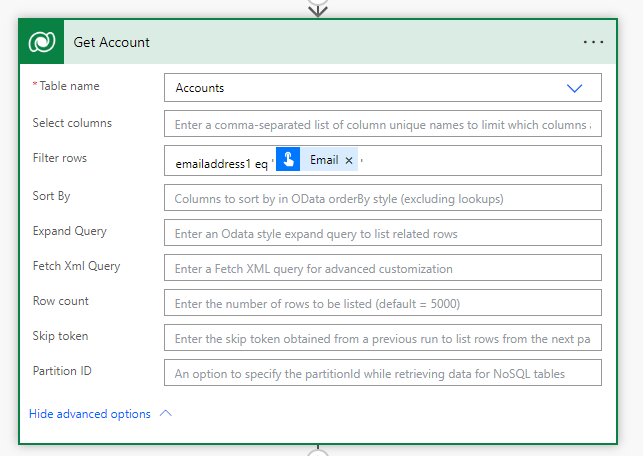
Now, let’s figure out which company is linked to that email address. We want to get the details of the account connected to the email you just provided.
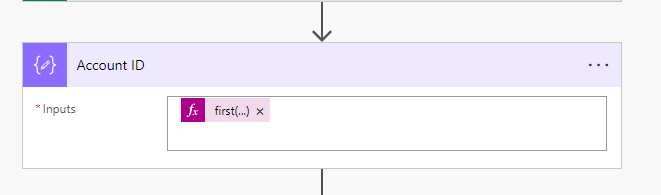
Let’s pick out the very first Account ID from the list we just talked about. It’s like saying, “Give me the details of the first company on that list.”
@{first(outputs(‘Get_Account’)?[‘body/value’])[‘accountid’]}
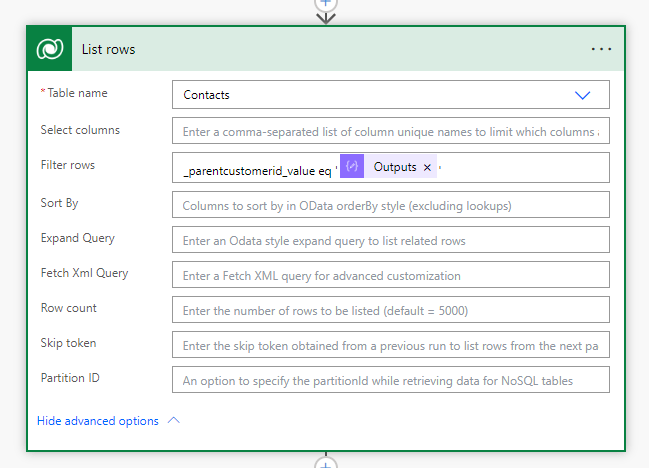
Now, let’s grab all the people linked to that account we found earlier. We’ll use the output from the account we just identified and get a list of all the contacts associated with it. It’s like finding everyone connected to that company.
In the next step, I’ve got something called “Compose.” This is where I’ve stored all the cool formatting styles using CSS. It’s like having a box of tricks that makes things look awesome when we put everything together.
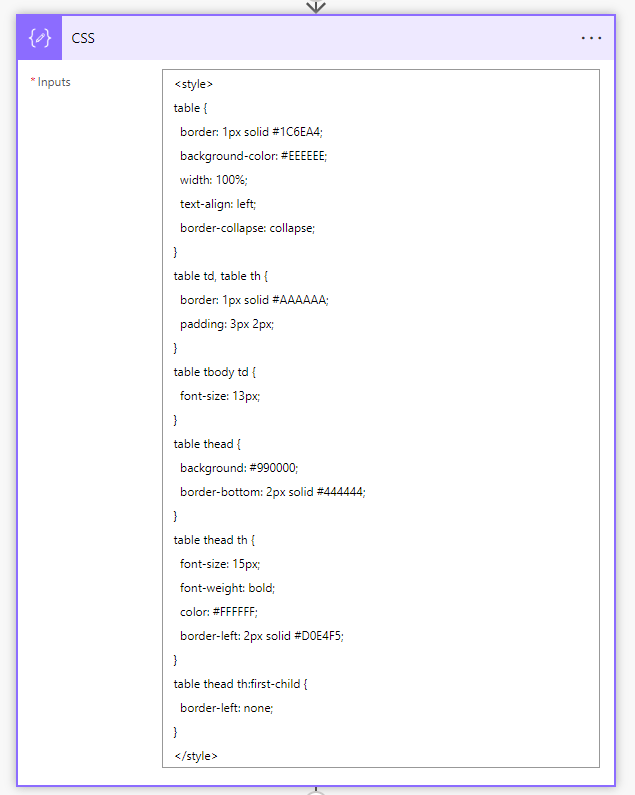
The code for the CSS is below:
<style>
table {
border: 1px solid #1C6EA4;
background-color: #EEEEEE;
width: 100%;
text-align: left;
border-collapse: collapse;
}
table td, table th {
border: 1px solid #AAAAAA;
padding: 3px 2px;
}
table tbody td {
font-size: 13px;
}
table thead {
background: #990000;
border-bottom: 2px solid #444444;
}
table thead th {
font-size: 15px;
font-weight: bold;
color: #FFFFFF;
border-left: 2px solid #D0E4F5;
}
table thead th:first-child {
border-left: none;
}
</style>
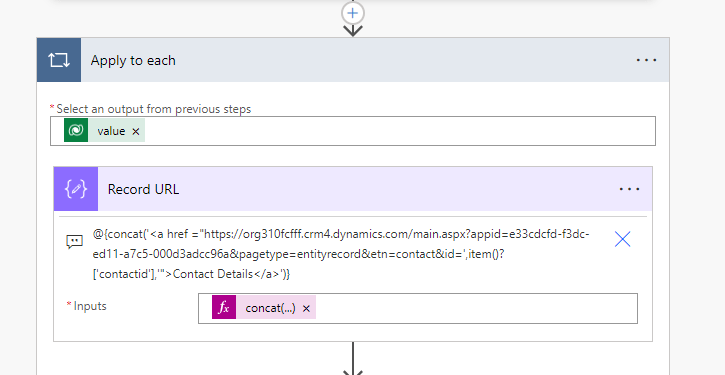
After that, we include a step called “Apply to each,” where we pick data from the list we got earlier and go through each item one by one. Then, I’ve set up another “Compose” step where I create the URL for clickable link. This link will be a part of HTML table we’re putting together, and it’ll work hand in hand with the CSS styles we set up earlier. Think of it like adding the finishing touch to each piece of information in our table.
@{concat(‘<a href =”https://abc.crm4.dynamics.com/main.aspx?appid=xyz&pagetype=entityrecord&etn=contact&id=’,item()?[‘contactid’],’”>Contact Details</a>’)}
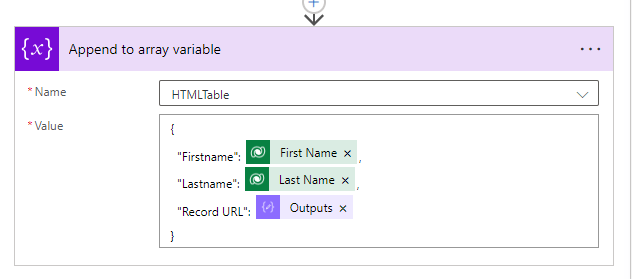
Now, I throw in an “Append to array variable” step. This helps me update that HTML table array variable I made earlier. I select the specific details I want from the list we fetched earlier, and grab the outputs from that step where we created the clickable URLs. It’s like adding all the puzzle pieces together – making sure the table has all the right information and links.
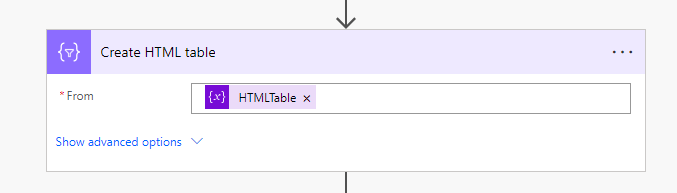
Moving on, I include a “Create HTML table” action, but this time it’s outside of the loop. I go ahead and select the HTML table array variable we’ve been working on from the dynamic content options. It’s like saying, “Okay, we’ve got all the details and links neatly organized, let’s put them into a proper HTML table format now.”
Finally, I set up a “Send an email” step. I choose the outputs we’ve got so far. And here’s the little trick: I add an expression to handle any tricky characters that might have popped up from creating the HTML table. It’s like giving the email a final polish and making sure it looks just right, even if there are some sneaky characters trying to mess things up.
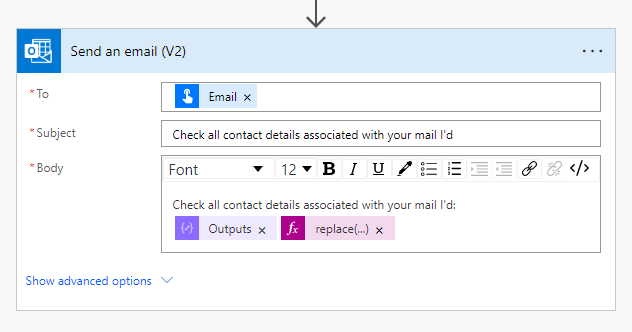
Using below expression, we’re swapping out any encoded characters with the ones we want. It’s like fixing any weird symbols that might have crept in when we were creating the link, ensuring our hyperlink looks clean and works smoothly in the email.
replace(replace(replace(body(‘Create_HTML_table’),’<’,'<‘),’>’,’>’),’"’,’”‘)
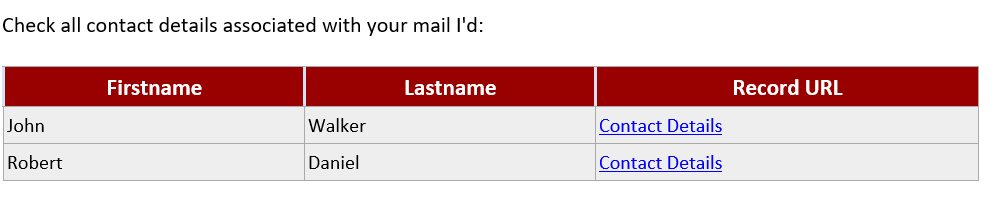
The Result:
When we kick off the cloud flow, the result is a beautifully organized table right in the email. And the cool part? Those links are clickable, leading straight to the records in our Model Driven App. It’s like delivering a well-packaged and interactive report without any extra effort.
Your overall flow will look like this-

As always, appreciate your time spent reading through. I hope everything is going well on your end. If you’ve got any questions or need assistance, you know where to find me – here and am ready to help!
Thanks for reading.
#Let’s_Learn_Together
Stay tuned with Power Spark for continuous learning.
Thank you! 🙂

Leave a comment